
Bacteria-phage genome analysis: A case study from a published paper
Runhang / 2022-07-29
Start: 2022-07-29
Last update: 2022-08-25
A case study from a published paper.
Here is a summary and rationale of this paper in my another post.
System information:
- OS: Linux-4.4.0-19041-Microsoft-x86_64-with-glibc2.31 (I used Windows Subsystem for Linux - Ubuntu in Mobaxterm in a Window 10 PC)
- Memory limit (in Gb): 16
- CPU: i7-7700k (4 core)
- Python version: 3.9.12
- Conda: 4.13.0
Bioinformatic tool overview
- Download sequences from NCBI SRA: sratoolkit v3.0.0
- Quality Check: FastQC v0.11.9
- Read Trimming and filtering: Trimmomatic v0.36
- De novo short-reads Assemler: SPAdes v3.15.4
- Assembly visualization: Bandage v0.8.1
- Mutation calling: Breseq v0.36.1
- Read alignment: Bowtie2 v2.4.5 (require to run Breseq)
- R v4.0.3 (required to run Breseq)
- Mobile genetic element mapping: MGEFinder
- anvio-7.1
1. Directly download sequence data of Pseudomonas aeruginosa in NCBI.
All sequences from the paper were deposited in NCBI SRA: PA14 BioProject:PRJNA491911, PAO1 BioProject:PRJNA633671.
In NCBI Bioproject, click the sample you are interested; save all SRR numbers of the samples into an accession list. It will be a txt file, which will be used in next step.
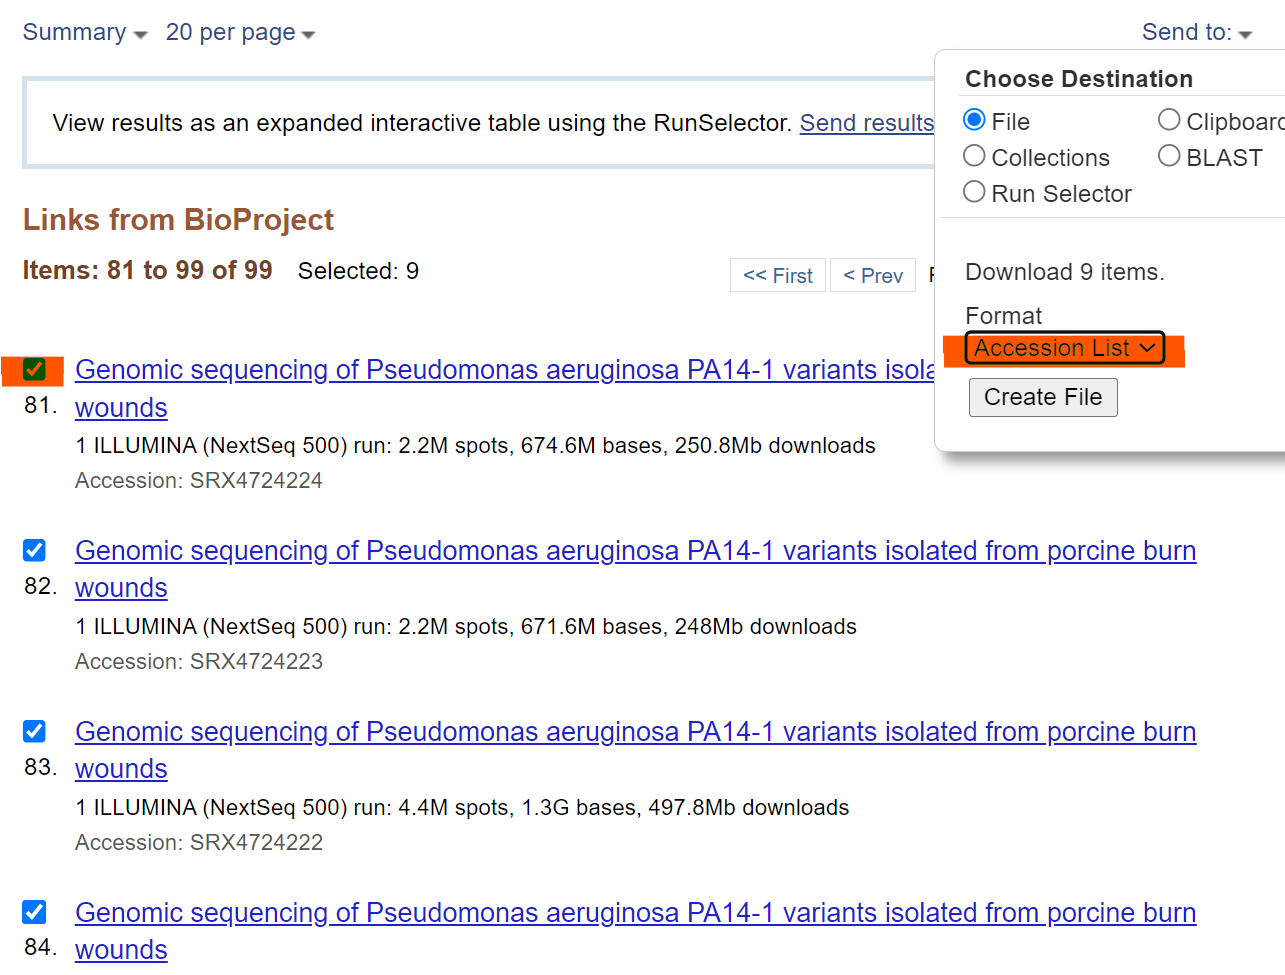
Download sratoolkit binaries here into your operating system .
Run you downloaded Accession_list file with the following command using a bash file.
Bash file (.sh) is a powerful file store all scripts and can be read by the Linux system. See how to use nano to create a bash file.
#! /bin/bash
### set up a PATH variable to tell you OS where to find the tool.
export PATH=$PATH:/mnt/c/Users/darsonshu/Documents/Siryaporn_lab/tools/sratoolkit.3.0.0-ubuntu64/bin
prefetch --option-file Accession_list.txt
for i in $(cat Accession_list.txt); do echo $i; date; fasterq-dump -S $i/$i.sra -O output_dir; done
This step downloaded the two fastq files (Illumina paired-reads) for each sample in your “output_dir” folder
2. Quality check, trimming, and filtering
Run fastqc to check the sequence quality
mkdir fastqc_output ### create a new folder for fastqc results
fastqc ./output_dir/* -o fastqc_output/ ### I assume you current working directory is not the fastq "output_dir". The star sign means you want the program to take every file in that folder.
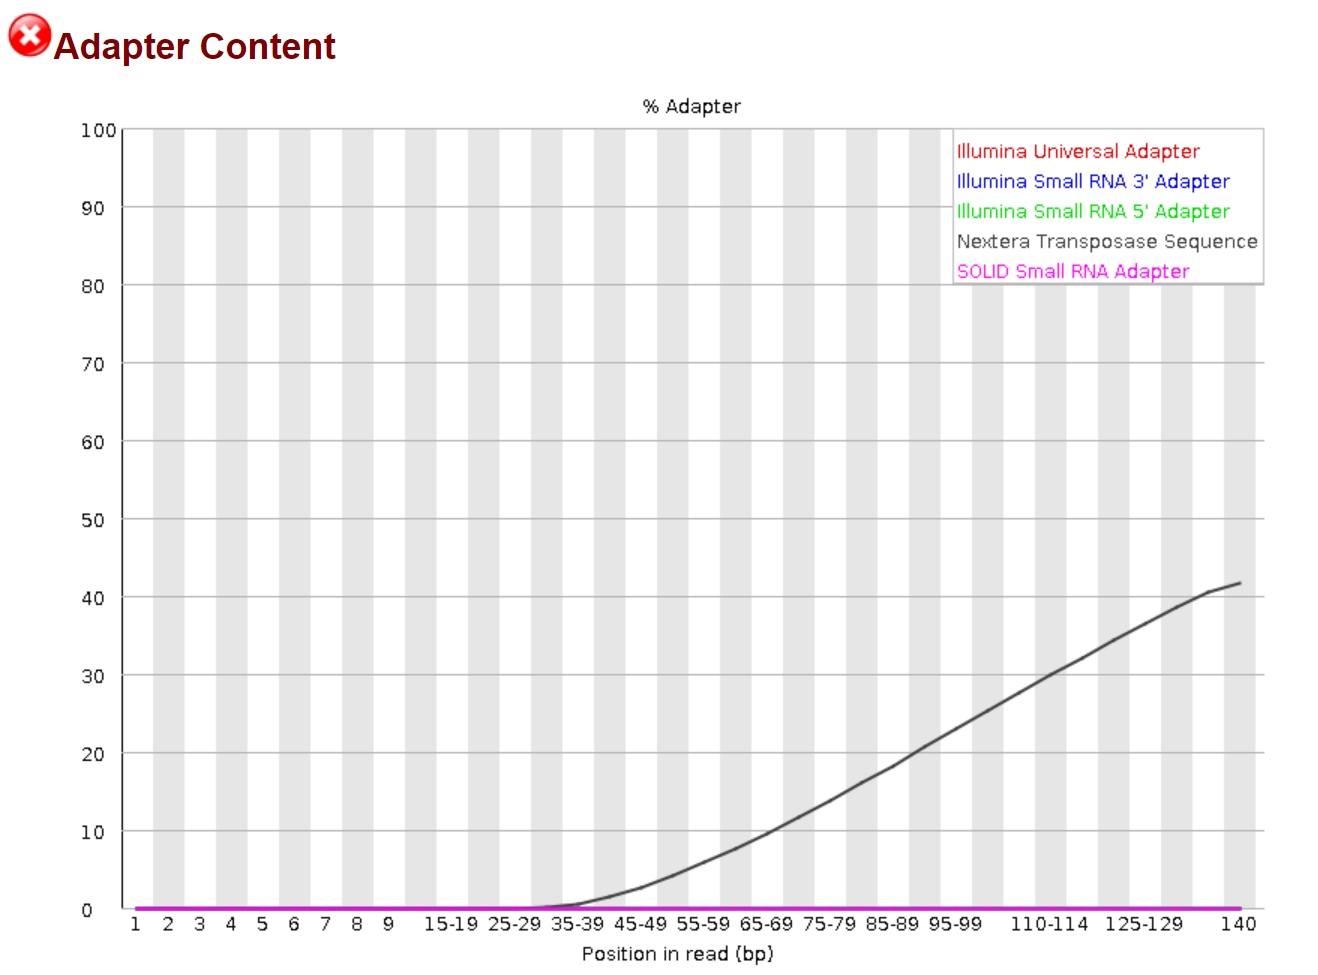
There is obvious Illumina sequencing adapter in the sequences, which needs to be trimmed before further analysis.
Use a loop function to run Trimmomatic.
I set NexteraPE-PE.fa:2:30:10 because the previous step tells us the sequences contain Nextera adapters.
cd output_dir ### go to the fastq folder
for file in ./*_1.fastq
do
withpath="${file}"
filename=${withpath##*/}
base="${filename%*_*.fastq}"
echo "${base}"
java -jar ../Trimmomatic-0.36/trimmomatic-0.36.jar PE ./"${base}"*_1.fastq ./"${base}"*_2.fastq ./"${base}"_1.trimmed_PE.fastq ./"${base}"_1.trimmed_SE.fastq ./"${base}"_2.trimmed_PE.fastq ./"${base}"_2.trimmed_SE.fastq \
ILLUMINACLIP:../Trimmomatic-0.36/adapters/NexteraPE-PE.fa:2:30:10 LEADING:3 TRAILING:3 SLIDINGWINDOW:4:20 MINLEN:36
done
Check the trimmed sequence with fastqc again.
mkdir trimmed_fastqc
fastqc *trimmed* -o trimmed_fastqc ### Again, the star signs tell the program to only take the trimmed fastq file.
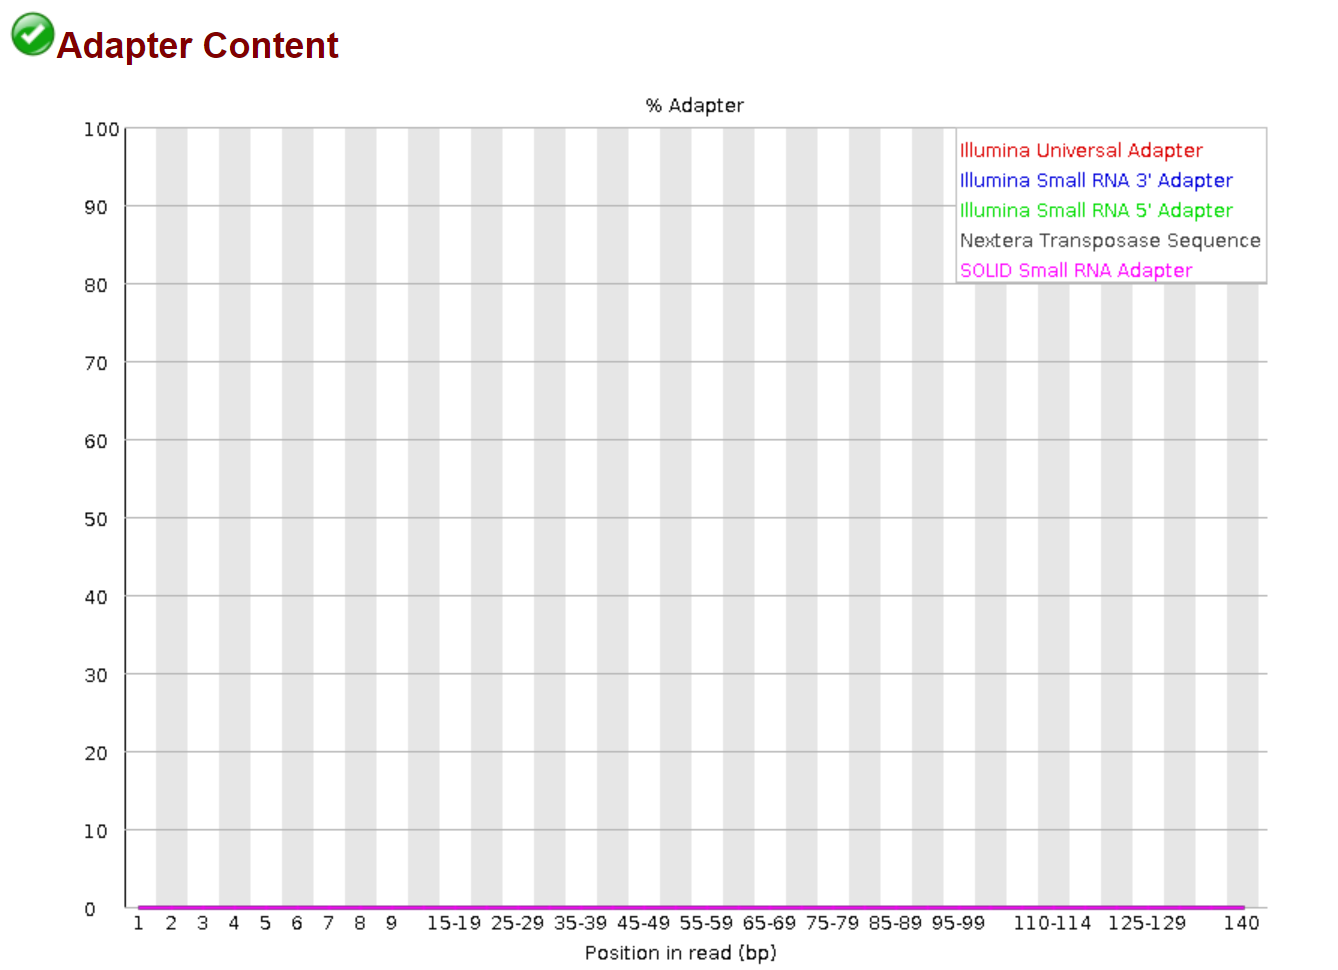
Now, the sequence data look much more cleaner. We can start the next step of assembly, alignment, and etc.
3. De novo assemble the short-reads using SPAdes
I downloaded SPAdes binaries for linux here.
Run the following command
#! /bin/bash
# tell your linux shell where to look for executable file
export PATH=$PATH:/mnt/c/Users/darsonshu/Documents/Siryaporn_lab/Pseudomonas_Sci_Advan/SPAdes-3.15.4-Linux/bin
for file in ./*_1.trimmed_PE.fastq
do
withpath="${file}"
filename=${withpath##*/}
base="${filename%*_1.trimmed_PE*.fastq}"
echo "${base}"
mkdir spades_output_"${base}"
spades.py --isolate --only-assembler -1 ./"${base}"_1.trimmed_PE.fastq -2 ./"${base}"_2.trimmed_PE.fastq -o spades_output_"${base}"
done
Vitualize the assembly
The file “assembly_graph.fastg” generated by SPAdes can be visualized in Bandage as shown below. Clearly, the assembly has many nodes and edges. So, the assembly level is Contig level, as compared to Complete genome level of PA14/PA01 reference genome (NC_008463.1/NC_002516.2).
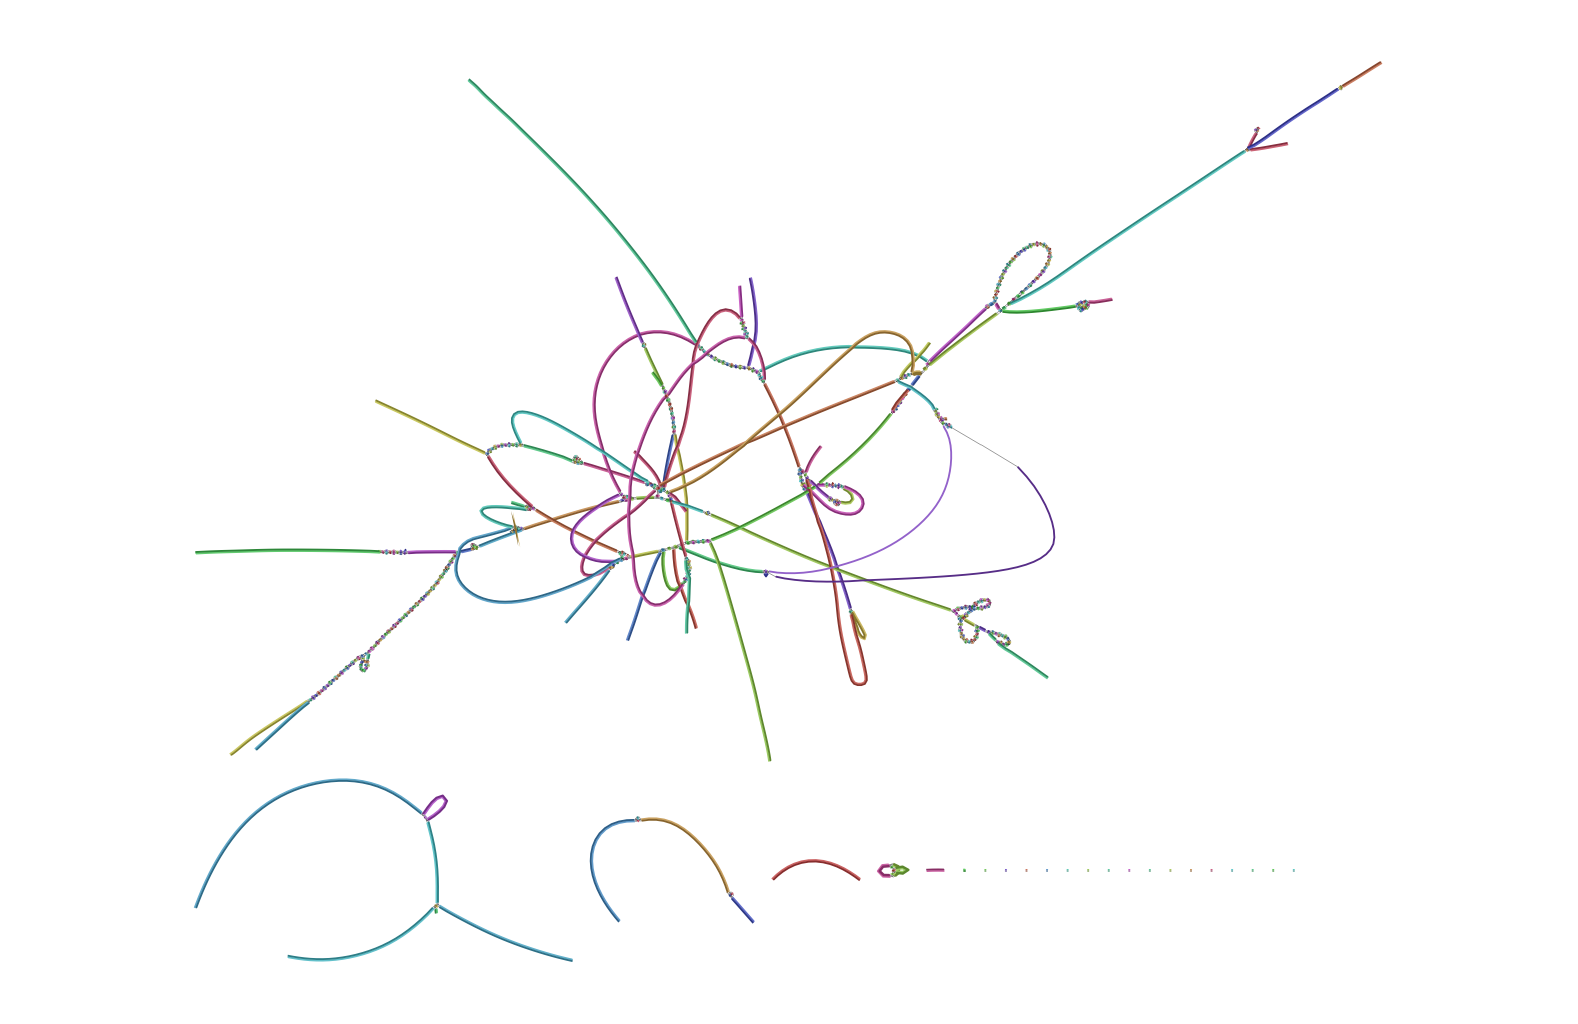
Question: What are the main differences between “complete genome” and a “contig level draft genome”? How do people curate draft genome to complete circular bacterial genome?
4. Mutation calling using Breseq
Breseq uses trimmed, unassembled illumina short-reads to align a reference genome and detect bacterial genetic mutations/insertions/indels. It is able to compare multiple clones with <1,000 genetic differences.
Download PA14 reference genome NC_008463.1 from NCBI-SRA
Make sure you select show sequence in the “customize view” and click “update view” and download the genebank (.gb) file manually.

Run the following command
#! /bin/bash
for file in spades_output*;
do
base="${file##spades_output_}";
echo "${base}";
mkdir spades_output_"${base}"/breseq
#### The input files are the trimmomatic output files (.fastq) and one reference genome PA01_reference_genome.gb
breseq -r /mnt/c/Users/darsonshu/Documents/Siryaporn_lab/tools/PA01_reference_genome.gb \
/mnt/c/Users/darsonshu/Documents/Siryaporn_lab/Pseudomonas_Sci_Advan/PA01_variants_fastq/"${base}"_1.trimmed_PE.fastq \
/mnt/c/Users/darsonshu/Documents/Siryaporn_lab/Pseudomonas_Sci_Advan/PA01_variants_fastq/"${base}"_2.trimmed_PE.fastq \
-o spades_output_"${base}"/breseq
done
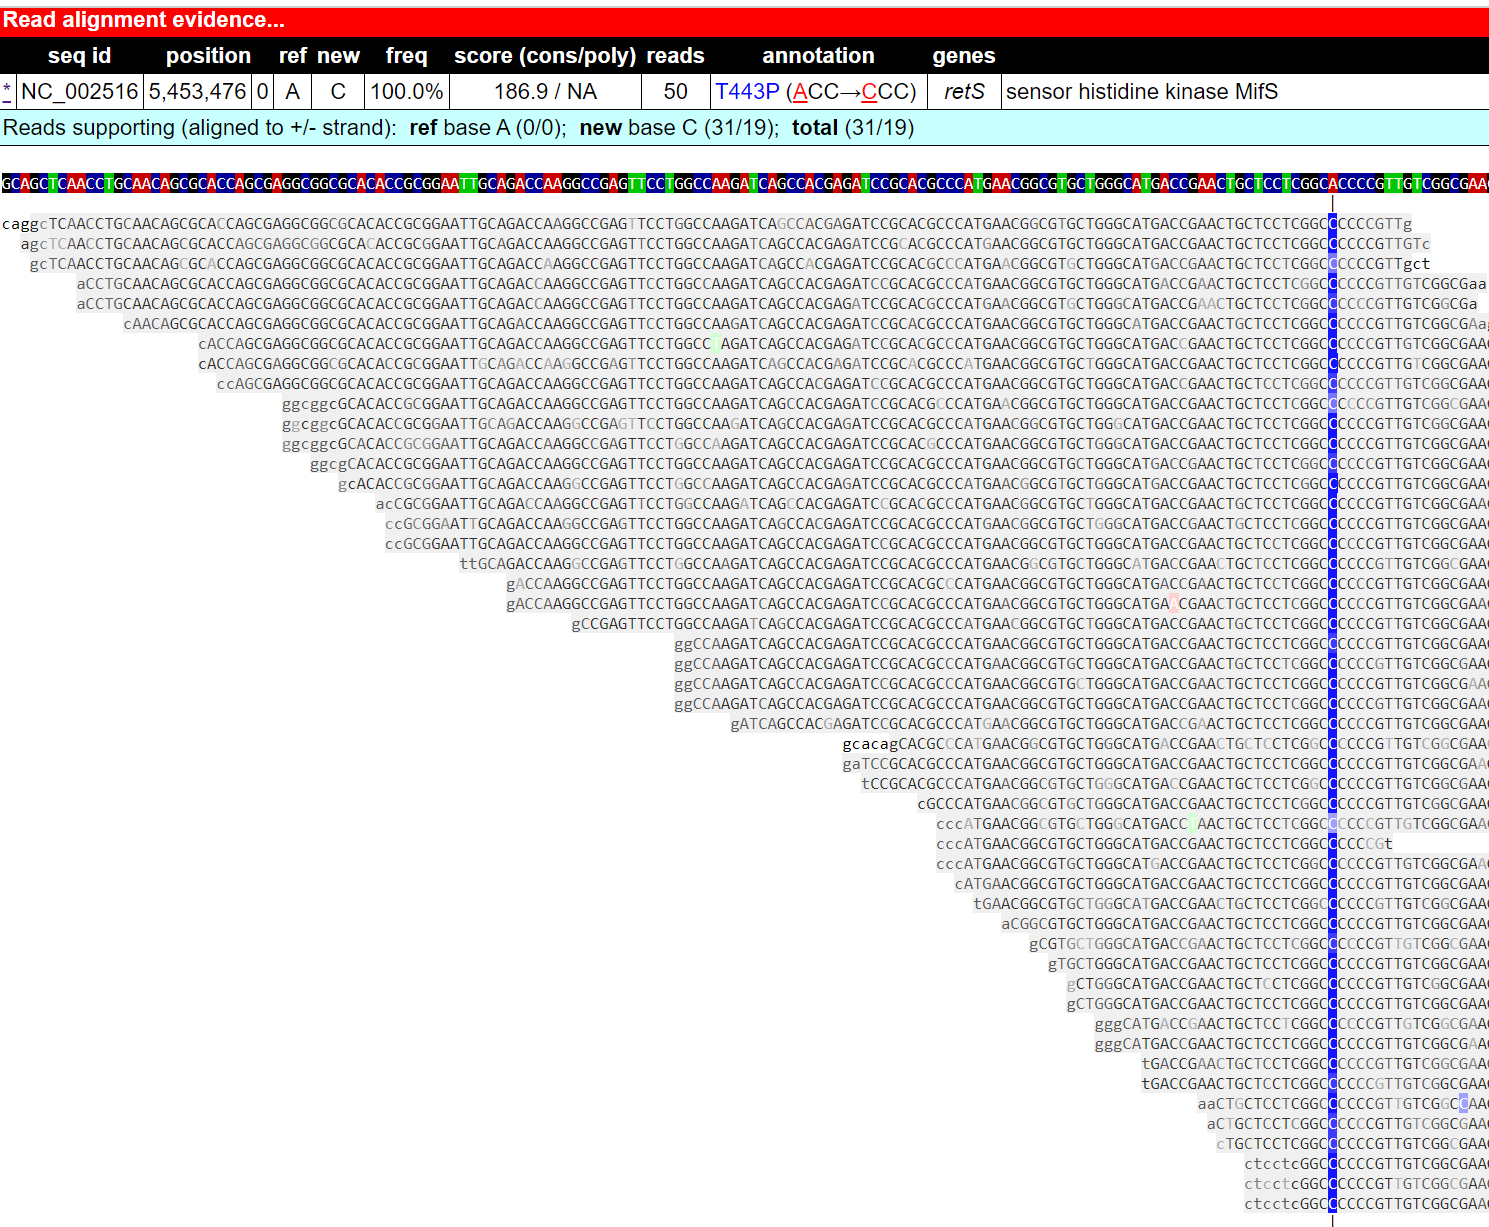
Explore the output HTML file
Breseq’s output summary file is an interactive HTML file contains a lot of information. The figure below is a screenshot of the output. It lists all genetic mutations of the inquiry genome in relation to the reference genome.

I repeated the discovery shown in the paper that PA01 isolate 41 (SRR11809631) has one point mutation in retS gene. This SNP leads to redish colony morphologies and hyperbiofilm-forming of PA01.
If you run multiple strains and want to put all summaries into one table, use gdtools of breseq.
5. Detect Mobile genetic elements (MGE) using MGEfinder
According to the paper: “All of the sequenced PAO1 RSCV isolates, and 50% of the PAO1 non-RSCV isolates, also acquired a putative conjugative plasmid from the strain S54485”. Therefore, I downloaded the S54485 (urinary track infection isolate, NZ_KI519256.1) fasta from NCBI and trying to use this as a reference genome to identify mobile elements that acquired by PA01 RSCV variants (60 isolates in total). This is proved to be not working because the mgefinder could not identify any insertion among the 48 PA01 isolates I tested. After I digged more into their metadata/sequencing info from NCBI, I noticed that, indeed, the authors have sequenced the S53385 and B23 ancestor strains with both Illumina and Nanopore sequencing, and used the relatively high-resolution assemblies as their reference genomes.
Download HTStream in Bioconda, deduplicate fastq
#Add channels for bioconda
conda config --add channels defaults
conda config --add channels bioconda
conda config --add channels conda-forge

#Install HTStream
conda install htstream

#Following command is to deduplicate fastq file using SuperDeduper in the HTStream toolset.
for i in $(cat ../SRR_Acc_PA01.txt); do echo $i;
hts_SuperDeduper -1 fasta/"$i"_1.fastq -2 fasta/"$i"_2.fastq -f fasta/"$i"_nodup
Trimming and filtering
#install binary trim_galore beforehand in your system
#if you do not have cutadapt, it will give error. Need to install it in conda: conda install cutadapt; you may also need to install fastqc: apt install fastqc
/mnt/d/Siryaporn_lab/tools/TrimGalore-0.6.6/trim_galore --fastqc -j 1 -e 0.1 -q 20 --length 36 --paired fasta/"$i"_nodup_R1.fastq.gz fasta/"$i"_nodup_R2.fastq.gz -o fasta
Assemble the genome
#If you are using WSL-Linux system, try to download and compiling SPAdes source code
#If you are using REAL Linux, you can just download SPAdes Linux binaries.
export PATH=$PATH:/mnt/d/Siryaporn_lab/Pseudomonas_Sci_Advan/SPAdes-3.15.5/bin
spades.py --isolate -1 fasta/"$i"_nodup_R1_val_1.fq.gz -2 fasta/"$i"_nodup_R2_val_2.fq.gz -o fasta/"$i"_assembly
#move all assembled genome into the assembly folder
mv fasta/"$i"_assembly/contigs.fasta workdir/00.assembly/"$i".fna
#move reference genome into the genome folder
mv /mnt/c/Users/darsonshu/Documents/Siryaporn_lab/tools/PA01_reference_genome.fasta workdir/00.genome
Index fastq with reference genome
bwa mem /mnt/d/Siryaporn_lab/tools/reference_genome.fasta fasta/"$i"_nodup_R1_val_1.fq.gz fasta/"$i"_nodup_R2_val_2.fq.gz > workdir/00.bam/"$i".reference_genome.sam
#convert sam file to bam file, as required by mgefinder
mgefinder formatbam workdir/00.bam/"$i".reference_genome.sam workdir/00.bam/"$i".reference_genome.bam
#move the output fasta and reference genome into corresponding directory. Also change the sufix to fna
mv fasta/"$i"_assembly/contigs.fasta workdir/00.assembly/"$i".fna
mv /mnt/d/Siryaporn_lab/tools/PA01_reference_genome.fasta workdir/00.genome/PA01_reference_genome.fna
Now, your working directory should look exactly like the following structure, including the .fna sufix.
workdir/
    ├── 00.assembly/
    │   ├── <sample1>.fna
    │   ├── <sample1>.fna
    │   └── <sample1>.fna
    ├── 00.bam/
    │   ├── <sample1>.<genome>.bam
    │   ├── <sample1>.<genome>.bam.bai
    │   ├── <sample2>.<genome>.bam
    │   ├── <sample2>.<genome>.bam.bai
    │   ├── <sample3>.<genome>.bam
    │   └── <sample3>.<genome>.bam.bai
    └── 00.genome/
        └── <genome>.fna
Analyze the dataset using mgefinder workflow
mgefinder workflow denovo workdir/
6. Install anvio in conda
I encountered a problem when trying to download anvio from anaconda. This might be due to me using virtural Linux system in a Win10 PC.
CondaHTTPError: HTTP 000 CONNECTION FAILED for url https://conda.anaconda.org/anaconda/linux-64/repodata.json
Elapsed: -

An HTTP error occurred when trying to retrieve this URL.
HTTP errors are often intermittent, and a simple retry will get you on your way.
SSLError(SSLError("Can't connect to HTTPS URL because the SSL module is not available.",),)
This is a SSL error. For windows 10, there is already OpenSSL. I solved this issue by adding following directories into user environment path in windows (go to Search box and type in: View Advanced System Settings, then select Environmental Variables: then select Path and click Edit: finally you can click New and add a path):
C:\your_directory_to_anaconda3\Anaconda3\Scripts
C:\your_directory_to_anaconda3\Anaconda3\
C:\your_directory_to_anaconda3\Anaconda3\Library\bin – This is the directory for openssl
There will be another issue about opening the interactive interface in Chrome as illustrated in this (post)[https://merenlab.org/2018/03/07/working-with-remote-interative/]. “When you are using a virtual Python environment, Python first looks for modules inside the active virtual environment before looking at other locations. So first, we will create a new webbrowser module in our virtual environment on the server side”. After setting this, you should be able to open http://localhost:port (i.e., 127.0.0.1:8081)
create contig database from fasta files
anvi-gen-contigs-database -f contigs-fasta -o contigs-db
create anvi’o genome storage
anvi-gen-genomes-storage -e external-genomes.txt -o PROCHLORO-GENOMES.db

## the external-genemes.txt is TAB-delimited file contain the path of the dabase we just created in last step
name	contigs_db_path
Name_01	/path/to/contigs-01.db
Name_02	/path/to/contigs-02.db
Name_03	/path/to/contigs-03.db
(…)	(…)
run a pangenome analysis
anvi-pan-genome -g pa01-GENOMES.db \
                --project-name "pa01_Pan" \
                --output-dir PA01 \
                --num-threads 6 \
                --minbit 0.5 \
                --mcl-inflation 10 \
                --use-ncbi-blast
display on the server
anvi-display-pan -g pa01-GENOMES.db -p PA01/pa01_Pan-PAN.db
show bins and their sequences in a project
anvi-show-collections-and-bins -p PA01/pa01_Pan-PAN.db
### get the full sequences of a pre-defined bin in the interactive server
anvi-get-sequences-for-gene-clusters -g pa01-GENOMES.db -p PA01/pa01_Pan-PAN.db -C default -b Bin_7 --concatenate-gene-clusters -o var32_mobile.fa

### To get the DNA sequences instead, just add --report-DNA-sequences.